Tools: Prusa i3 MK3S+: Difference between revisions
Jump to navigation
Jump to search
No edit summary |
was missing Tools category grr |
||
| Line 1: | Line 1: | ||
[[File:Prusa1.jpg|300px|right]] | [[File:Prusa1.jpg|300px|right]] | ||
<span style="background-color:#fef6e7; border: 1px solid #fc3; padding:8px;>Training class required</span> | <span style="background-color:#fef6e7; border: 1px solid #fc3; padding:8px;">Training class required</span> | ||
== Tool Description: == | == Tool Description: == | ||
| Line 63: | Line 63: | ||
* Extruders and build plate are HOT: 100 C to 270 C. | * Extruders and build plate are HOT: 100 C to 270 C. | ||
[[Category:Tools]] | |||
[[Category:3D Printing]] | [[Category:3D Printing]] | ||
[[Category:Materials:PETG]] | [[Category:Materials:PETG]] | ||
[[Category:Materials:PLA]] | [[Category:Materials:PLA]] | ||
Latest revision as of 00:36, 21 July 2024

Training class required
Tool Description:
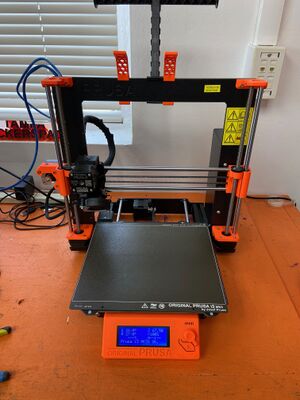
Build Envelope: 25×21×21 cm (9.84"×8.3"×8.3")
Nozzle: 0.4mm
Specs and Features - Prusa Site
Manuals and Downloads - Prusa Site
Usage Notes
- Power switch is in right rear
- X button below front panel knob is hard reset
- If pressed, will need to reconnect to printer in OctoPrint
- Flexible, removable bed plate
- Remove by lifting at front
- Return to printer by aligning rear edge first
- Clean bed only with isopropyl alcohol (small spray bottle) and lint-free wipe
- No extra adhesives allowed: no glue sticks, no tape, no hair spray, no ABS slurry
- Do not clean bed with acetone - you will damage the coating
- Do not use metal tools on the bed, only soft plastic, fingernails, credit card, etc.
- Load filament via menus
- Cut filament tip at 45 degree angle before loading
- Recommend Hatchbox or Prusa filament
- Currently only allowing PLA and PETG on this printer
- Consult shop stewards for different filament needs
OctoPrint
- Can send directly to OctoPrint from Slicer on 3D printing area PC
- Pick the Physical Printer option
- OctoPrint will run the ArcWelder plugin to optimize the uploade gcode
- Print the version of gcode with .aw added to filename to get optimized version
- Print the version without .aw to get original slicer gcode output
- At start of print, printer may beep and warn about needing firmware upgrade - ignore this
- Recommended to use brass brush tool to clean pre-heated nozzle before printing
- Monitor the start of your print - at least the first few layers
- Unload the filament when done
- Infill over 40% is generally wasted
- If you customize slicer settings, they will not save on 3D printing PC
- To save your own custom settings, save to a .3MF file [note: not seeing how to do this]
- When loading a .3MF file, if you drag it into slicer, it may override printer settings
- Instead use the Add tools to add the .3MF file and only take the object model(s)
General and Special Safety Considerations:
This is not an exhaustive list!
- Read, understand and follow all warning labels, instructions and safety manuals.
- Take the class.
- Extruders and build plate are HOT: 100 C to 270 C.